
Finishing or remodeling a basement can add tremendous value to your home, and lighting plays a crucial role in transforming the space from dark and dingy to bright and functional. One of the most important (and often misunderstood) stages of installing basement lighting is the rough-in phase—where you pre-wire the system before insulation and drywall go up. This article breaks down everything you need to know about roughing in new lights and connecting them to existing circuits, safely and effectively.
Whether you’re a seasoned DIYer or tackling your first basement renovation, this comprehensive guide will walk you through the planning, code requirements, materials, and steps involved in roughing in basement lighting.
What Is “Roughing In” Lights?
Rough-in wiring refers to installing electrical boxes, running electrical cables, and preparing for future fixtures before the walls and ceiling are finished. This phase occurs after framing but before insulation and drywall.
During rough-in:
- You determine fixture locations
- You install boxes for lights and switches
- You run NM-B (Romex) wiring between these points and the panel or an existing circuit
- All connections are left unfinished for inspection and later trimming
Read More: Creating a Home Gym in an Unfinished Basement Space
Why It’s Crucial in Basement Projects
Basements are typically unfinished or partially finished spaces, meaning most lighting will need to be planned from scratch. Roughing in:
- Allows hidden cable routing
- Ensures code compliance before walls are closed
- Prevents expensive rework later
- Makes it easier to tie into existing lighting circuits upstairs or in the basement
Read More: How to Make an Unfinished Basement Gym in Your Home
Planning Your Lighting Rough-In
Before you start pulling cable, take time to create a lighting plan that fits your basement’s layout and function.
Step 1: Assess Your Electrical Load
- 15A circuit = ~1,440 watts max
- 20A circuit = ~1,920 watts max
- LED lights typically use 8–15 watts each, so they’re ideal
If you’re adding lights to an existing circuit, ensure the total load doesn’t exceed 80% of the breaker’s capacity.
Read More: Basement Home Gym Ideas for the Ultimate Workout Space
Step 2: Map Your Lighting Layout
- Choose fixture types: Recessed lights, flush mounts, pendants, or track lighting
- Design for zones (e.g., gym, office, media room)
- Plan switch locations for accessibility and function
Use masking tape or chalk to mark fixture locations on the ceiling and walls.
Read More: Basement Gym Guide: How to Build the Ultimate Home Fitness Space
Tools & Materials for Lighting Rough-In
Tools
- Stud finder
- Drill/driver with bits
- Fish tape or cable puller
- Wire stripper
- Drywall saw
- Voltage tester
Read More: Organized Basement Home Gym Ideas: Maximize Your Space and Motivation
Materials
- 14/2 or 12/2 NM-B (Romex) cable
- Electrical boxes (new work or remodel)
- Cable staples
- Wire nuts
- Switches and light fixtures
- Cable clamps
- Protective nail plates (for cable protection through studs)
Read More: 75 Small Laminate Floor Basement Ideas You’ll Love
Roughing In: Step-by-Step Guide
Step 1: Turn Off Power and Identify Circuits
If tying into an existing light circuit, turn off the corresponding breaker at the panel. Use a non-contact voltage tester to confirm the circuit is dead.
Read More: Transform Your Basement with Laminate Flooring: A Stylish, Affordable Upgrade
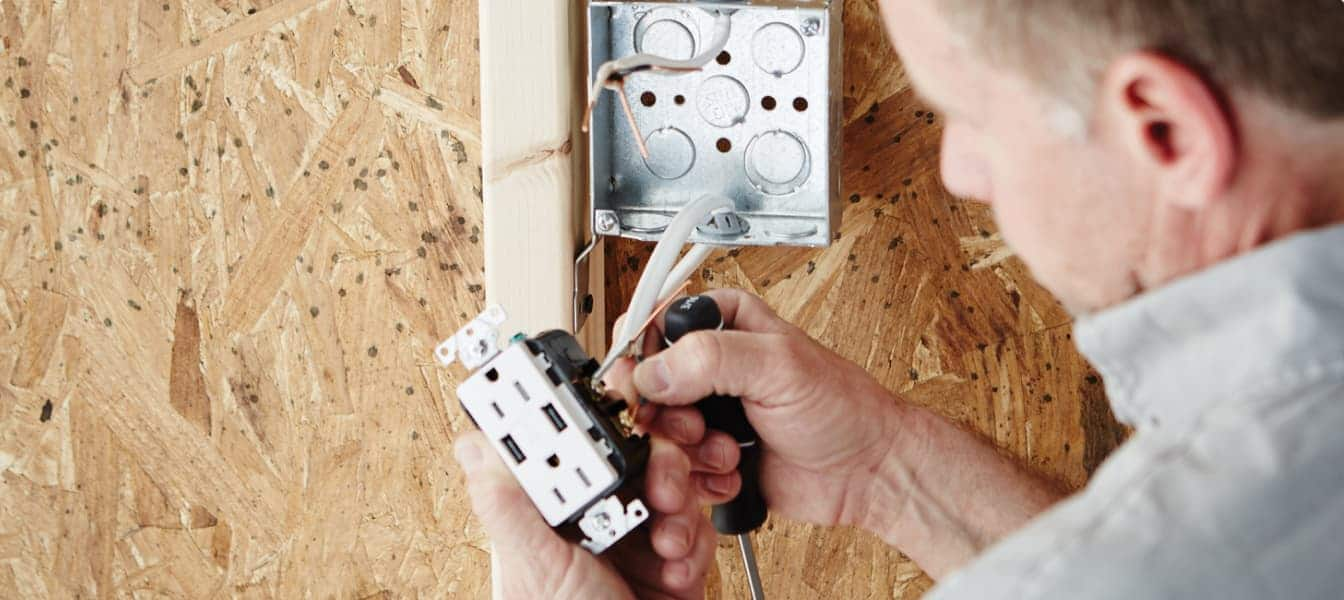
Step 2: Install Light and Switch Boxes
- Nail or screw new work boxes into framing members
- For ceiling lights, install round ceiling boxes rated for fixture weight
- Ensure box openings are flush with the future drywall
Read More: The Basement: Installing the Laminate Floor – A Complete DIY Guide
Step 3: Drill Cable Holes
- Drill 3/4″ holes through joists or studs to run cable
- Maintain at least 1.25” clearance from the edge of framing (code requirement)
- Use nail plates on studs where wires are too close to the surface
Read More: How to Choose Flooring for Your Basement Renovation: The Complete Guide
Step 4: Run Electrical Cable
- Run 14/2 or 12/2 NM cable from:
- The power source (existing light or outlet)
- To the switch box
- From switch to light boxes
Mark both ends of the wire runs with tape or label them to avoid confusion during the trim-out phase.
Read More: Using Laminate Flooring in Basements: What to Know Before You Install
Step 5: Secure Cables and Prepare for Inspection
- Secure cables within 8–12 inches of every box using cable staples
- Leave at least 6 inches of wire hanging from each box for easy fixture/switch installation
- Cap the wires with wire nuts or tape for safety
Read More: 44 DIY Unfinished Basement Ideas to Maximize Space on a Budget
Tying Into Existing Basement or Upstairs Lights
If you have existing lights in the basement, you may be able to:

- Tap into the nearest ceiling light or junction box
- Extend the circuit to include new zones or fixtures
- Add additional switches to create separate lighting zones
Important Rules:
- Don’t overload the circuit
- Never tap into circuits serving bathrooms, kitchens, or GFCI outlets
- Make sure wire gauge matches breaker (14-gauge for 15A, 12-gauge for 20A)
- If unsure, consult a licensed electrician
Read More: Cost of a Basement Remodel in Maryland: 2025 Pricing & Guide
Code & Safety Tips
Complying with the National Electrical Code (NEC) and local regulations is essential:
- Permits are often required for rough-in work
- Inspection is usually needed before drywalling
- Use IC-rated recessed lights for ceilings with insulation
- Secure all cables properly and avoid over-stuffing boxes
- Label circuits clearly at the panel
Read More: Cheap Concrete Basement Floor Solutions: Budget-Friendly Ideas That Work
Connecting Lights After Rough-In (Finish Phase)
After drywall is installed and painted, return to:
- Strip and connect wires inside boxes
- Install light fixtures
- Mount switches and faceplates
- Test all lights and switches
Read More: Basement Finishing on a Budget: How to Transform Your Space Affordably
Rough-In Lighting Cost Breakdown (DIY)
| Item | Cost Estimate |
|---|---|
| NM Cable (100 ft) | $30–$60 |
| Boxes (10 units) | $20–$40 |
| Recessed Lights (6–10 units) | $100–$200 |
| Switches and Dimmers | $30–$70 |
| Miscellaneous (wire nuts, staples, plates) | $30–$50 |
| Total DIY Cost | $200–$400 |
Hiring an electrician can cost $800–$2,000 for similar work.
Read More: Top 5 Budget Basement Flooring Ideas: Affordable Options That Don’t Sacrifice Style
Expert Tips for Better Results
- Use LED lights to minimize power draw
- Add 3-way switches for large rooms with multiple entrances
- Use smart switches or motion sensors for added convenience
- Add a separate breaker if current circuits are near capacity
Read More: Smart Ideas for Your Basement Flooring: Durable, Stylish, and Budget-Friendly Options
Final Thoughts
Roughing in lights in your basement is an essential step to creating a bright, usable, and enjoyable living space. Whether you’re adding to existing lights or building a new lighting system from scratch, following code, planning carefully, and taking safety seriously will ensure a successful project.
If you’re confident with basic electrical skills and follow local code guidelines, this is a very manageable DIY project that can save money and increase your home’s value.