
Framing your basement is the cornerstone of any successful remodel. Whether you’re turning your space into a home gym, office, family room, or rental suite, basement framing gives structure to your ideas—literally. If you’re a DIY enthusiast, this 2024 guide to basement framing will walk you through everything you need to know, from planning to execution.
What Is Basement Framing?
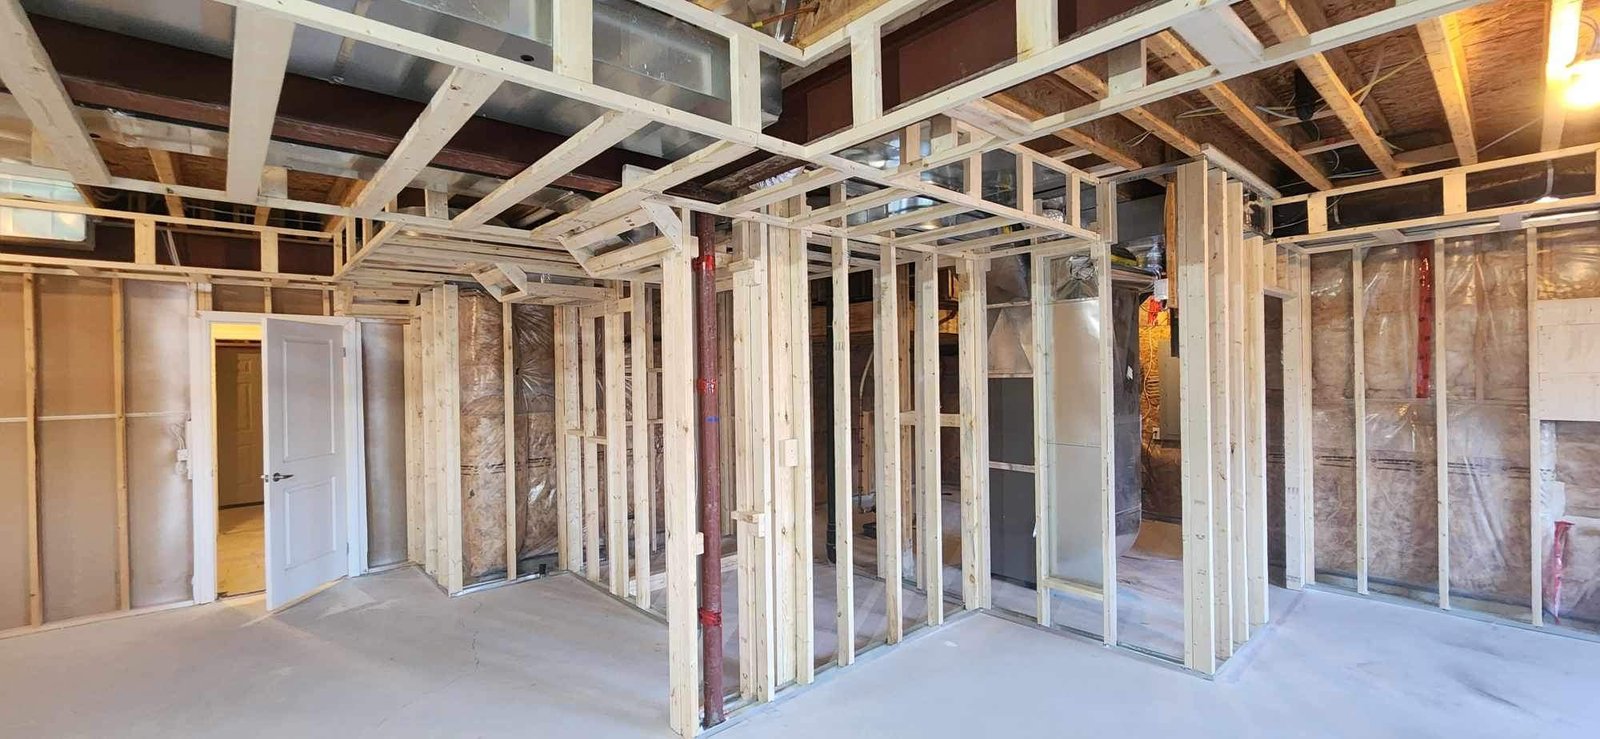
Basement framing is the process of constructing the skeleton of walls, ceilings, and other structural components using wood or metal studs. It sets the foundation for installing insulation, drywall, electrical wiring, and more.
Pro Tip: Good framing is crucial—if it’s off, everything that follows (drywall, finishes, etc.) will suffer.
Read More: DIY Basement Storage Shelves: A Complete Guide to Maximizing Space
Why Frame Your Basement?
- Adds structure for finished walls, doors, and ceilings
- Increases home value with usable living space
- Supports insulation for temperature and sound control
- Allows room division for specific purposes like bedrooms or offices
- Essential for code compliance if you’re doing a full basement renovation
Read More: How to Install Shelves on a Concrete Basement Wall (DIY Guide)
Tools & Materials You’ll Need in 2024
Essential Tools:
- Tape measure
- Chalk line
- Circular saw or miter saw
- Hammer or nail gun
- Level or laser level
- Framing square
- Safety glasses & gloves
- Drill/driver
Read More: How to Build Shelves for Your Basement: A Complete DIY Guide
Common Materials:
- Pressure-treated 2×4 lumber for bottom plates
- Regular 2×4 lumber for vertical studs
- Construction adhesive (for bottom plate to concrete)
- Masonry nails or concrete anchors
- Galvanized nails or screws
- Insulation and vapor barrier (for later stages)
2024 Tip: Consider using metal studs in humid basements for moisture resistance and longevity.
Read More: 100 Best Basement Storage Ideas to Maximize Space and Organization
Planning Your Basement Framing Layout
Before cutting a single board, plan your space:
- Check local building codes
Always verify code requirements (minimum ceiling height, egress windows, fire blocking, etc.). - Design your layout
- Mark where walls will go
- Plan for doorways and closets
- Leave space for utility access (furnace, sump pump, etc.)
- Mark your walls
Use a chalk line to snap straight lines on the floor and ceiling for wall placement. - Account for obstacles
Work around beams, pipes, and electrical panels. Use soffits or framed chases for concealment.
Read More: DIY Basement Shelving: Maximize Storage with These Smart Ideas
Step-by-Step: How to Frame Basement Walls
1. Mark Your Wall Location
/SPR-how-to-frame-a-wall-5188151-hero_5382-6300f7a4472c4117ac66cdd03812093b.jpg)
Use a chalk line to draw the wall outline on the floor. Then, use a plumb bob or laser level to transfer the same line to the ceiling joists.
Read More: Painting Your Finished Basement Right: A Complete DIY Guide
2. Install the Bottom and Top Plates
- Use pressure-treated lumber for the bottom plate (in contact with concrete).
- Attach bottom plate to the floor using concrete nails, Tapcon screws, or construction adhesive.
- Secure the top plate to joists above with nails or screws.
Read More: Easy Steps To Paint Basement Walls Like A Pro
3. Cut and Install Studs
- Measure and cut vertical studs to fit tightly between the top and bottom plates.
- Stud spacing should be 16 inches on center (OC)—a standard for drywall installation.
- Use a framing square to keep everything aligned.
Read More: Paint Prep for a Basement Remodel: Trick to a Great Paint Job
4. Frame Around Windows and Doors
- Use king studs and jack studs to frame openings.
- Add headers above doors and windows for support.
- Ensure window framing meets egress code if it’s a bedroom.
Read More: Painting the Basement from Top to Bottom: A Complete DIY Guide
5. Add Blocking and Fire Stops
- Install horizontal blocking between studs for:
- Fire safety (fire blocking every 10 feet vertically)
- Mounting cabinets or fixtures
- Drywall support behind seams
Read More: Painting the Basement: DIY Tips and Tricks for a Flawless Finish
6. Frame Soffits and Utility Access
- Frame soffits around ductwork, pipes, or beams using 2×2 or 2×4 lumber.
- Leave removable access panels for important utility areas.
Read More: Finishing Out Basement Walls: A Step-by-Step DIY Guide to a Warm, Dry, and Beautiful Space
7. Double Check for Level and Square
- Use a 4-foot level or laser level to ensure walls are plumb.
- Confirm everything is square using a framing square or 3-4-5 triangle method.
Read More: Cozy Cinder Block Basement Walls Renovation Ideas: Turn Cold Into Comfort
Electrical & Insulation Considerations (Post-Framing)
After framing:
- Run electrical wiring through drilled holes in studs
- Install electrical boxes where needed
- Add insulation and vapor barrier per your region’s requirements
Pro Tip: Coordinate with an electrician early, even if you plan on DIY electrical later.
Read More: Basement Block Wall Ideas: Stylish & Functional Finishing Options for Concrete Walls
Wood vs. Metal Studs: Which to Choose?
| Feature | Wood Studs | Metal Studs |
|---|---|---|
| Cost | More affordable | Slightly more expensive |
| Moisture resistance | Susceptible to rot | Excellent |
| Ease of use | Easier to cut & nail | Requires screws & snips |
| Load bearing | Can support heavy loads | Needs extra support |
| Tools needed | Basic carpentry tools | Metal-specific tools |
Bottom Line: Use wood for DIY ease, or metal in damp/moist basements.
Read More: DIY Basement Remodeling with Concrete Block Walls: A Complete Homeowner’s Guide
Bonus Tips for DIY Framing Success
- Label each wall section and stud length to stay organized
- Pre-build wall sections and tilt up for long straight runs
- Use adhesive along the bottom plate to prevent squeaking and extra movement
- Keep extra blocking in mind for mounted TVs, shelves, or railings
- Consider soundproofing if you’re framing near bedrooms or noisy areas
Read More: How to Finish a Basement Wall: DIY Guide for Homeowners
How Long Does DIY Basement Framing Take?
| Basement Size | Estimated DIY Time |
|---|---|
| 400 sq. ft. | 2–3 weekends |
| 800 sq. ft. | 3–4 weekends |
| 1,000+ sq. ft. | 1–2 months (part-time) |
Time varies based on layout complexity, experience, and available help.
Read More: How to Finish a Basement Wall (DIY): A Complete Step-by-Step Guide
Estimated Cost of Basement Framing in 2024
| Item | Average Cost (DIY) |
|---|---|
| Lumber (per 100 linear ft) | $75–$125 |
| Concrete anchors & screws | $25–$50 |
| Tools (if buying new) | $150–$400 |
| Insulation (optional later) | $0.50–$1.50 per sq. ft. |
| TOTAL (500 sq. ft. project) | $800–$1,200 |
Read More: How to Build Finished Walls in a Basement: A Step-by-Step DIY Guide
Final Thoughts
Framing a basement is one of the most rewarding DIY projects you can take on. With the right tools, materials, and planning, you can build a solid foundation for the basement of your dreams—without needing professional help. Stick to the step-by-step process outlined in this guide and you’ll be ready for insulation, drywall, and all the finishing touches in no time.