
Finishing a basement is one of the most rewarding home improvement projects you can take on. It transforms unused space into something functional, like a home gym, entertainment area, guest suite, or home office. But one critical aspect that homeowners often overlook or struggle with is lighting—especially when trying to add new lights to an existing electrical circuit.
This comprehensive guide covers everything you need to know about safely and efficiently adding lighting to an existing circuit while finishing your basement. From understanding electrical loads to wiring techniques and safety tips, we’ll guide you step-by-step.
Why Add Lights to an Existing Circuit?
Adding lights to an existing circuit is:
- Cost-effective: Saves money by not requiring a new circuit or panel upgrade.
- Convenient: Utilizes existing wiring routes.
- Efficient: Reduces material and labor time.
However, there are important considerations and code requirements you need to follow to ensure safety and functionality.
Read More: Considerations When Finishing Your Basement: The Ultimate Homeowner’s Guide
Step 1: Assess the Existing Electrical Circuit
Before adding any lights, it’s essential to evaluate the current electrical load to ensure the circuit can handle additional fixtures.
Determine:
- Amperage of the circuit breaker (typically 15A or 20A)
- Type of wiring (14-gauge for 15A, 12-gauge for 20A)
- Existing load on the circuit (how many lights and outlets already exist)
Read More: HVAC Upgrades to Consider When Finishing Your Basement: A Complete Guide
Load Capacity Calculation:
Use this formula to estimate:
matlabCopyEditCircuit Amps x 120 volts x 80% = Safe Wattage Load
- 15A Circuit: 15 × 120 × 0.8 = 1,440 watts
- 20A Circuit: 20 × 120 × 0.8 = 1,920 watts
If you’re using LED lights that draw only 10–20 watts each, you can likely add several new lights without issue.
Read More: Best Way to Heat and Cool a Basement: Expert Guide for Year-Round Comfort
Step 2: Plan Your Lighting Layout
Basements typically lack natural light, so proper artificial lighting is essential.
Lighting Options:
- Recessed LED lights (most popular for low ceilings)
- Track lighting
- Flush-mount ceiling lights
- Wall sconces
Read More: Tips on How to Heat and Cool a Finished Basement: A Complete Homeowner’s Guide
Design Tips:
- Use zones for different areas (e.g., living area, gym, laundry).
- Use dimmers to create ambiance.
- Include 3-way switches for rooms with multiple entrances.
Mark out your layout clearly before starting any work.
Read More: Keeping Cool This Summer: Top Basement Remodeling Trends to Watch
Step 3: Gather Your Tools and Materials
Tools:
- Voltage tester
- Wire strippers
- Screwdriver
- Drill
- Drywall saw
- Fish tape
- Pliers
Read More: Basement Heating and Air Conditioning Considerations: A Complete Guide
Materials:
- 14/2 or 12/2 NM-B (Romex) cable
- Wire nuts
- Electrical boxes
- Light fixtures
- Switches and faceplates
Make sure all components are UL-listed and code-compliant.
Read More: HVAC in Your Basement: Everything You Need to Know for Optimal Comfort
Step 4: Turn Off Power and Confirm It’s Off
Safety first! Go to your breaker panel and shut off the breaker connected to the circuit you’ll be working on.
Use a non-contact voltage tester to ensure wires are dead before touching them.
Read More: The Guide to Finished Basement HVAC: Steps for Planning a Comfortable Space
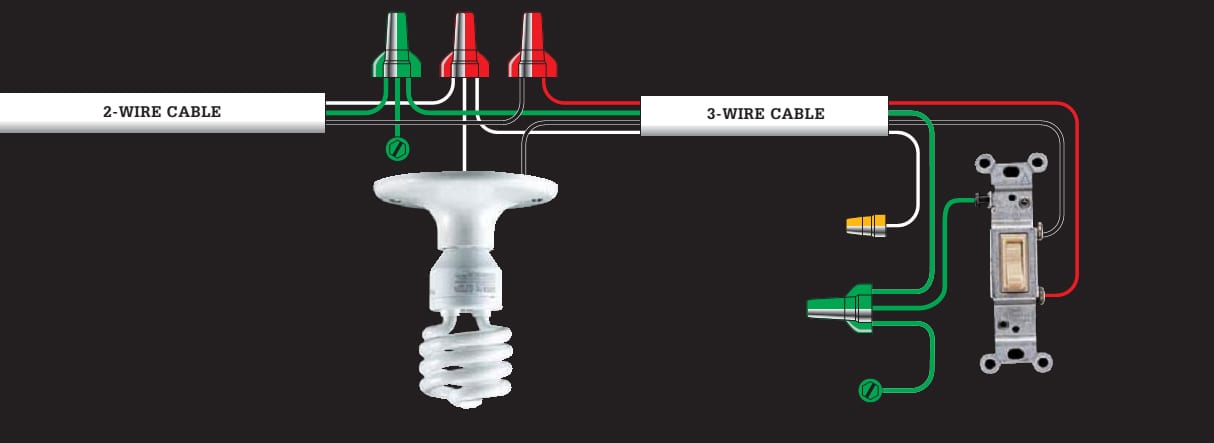
Step 5: Tap Into the Existing Circuit
Find the nearest accessible junction box or light fixture that’s part of the circuit you want to use.
To tap in:
- Remove the fixture cover.
- Run new NM cable from the junction box to your new light location.
- In the box, connect:
- Black (hot) to black
- White (neutral) to white
- Bare copper (ground) to ground screw or wire
- Secure all connections with wire nuts.
Read More: Transforming Your Basement into a Home Gym: A Complete Guide
Box Fill Alert:
Ensure you don’t overfill the junction box. Follow NEC box fill calculations to avoid code violations or overheating.
Read More: 15 Tips to Build the Ultimate Basement Gym
Step 6: Install and Connect New Lights
Depending on the type of fixture:
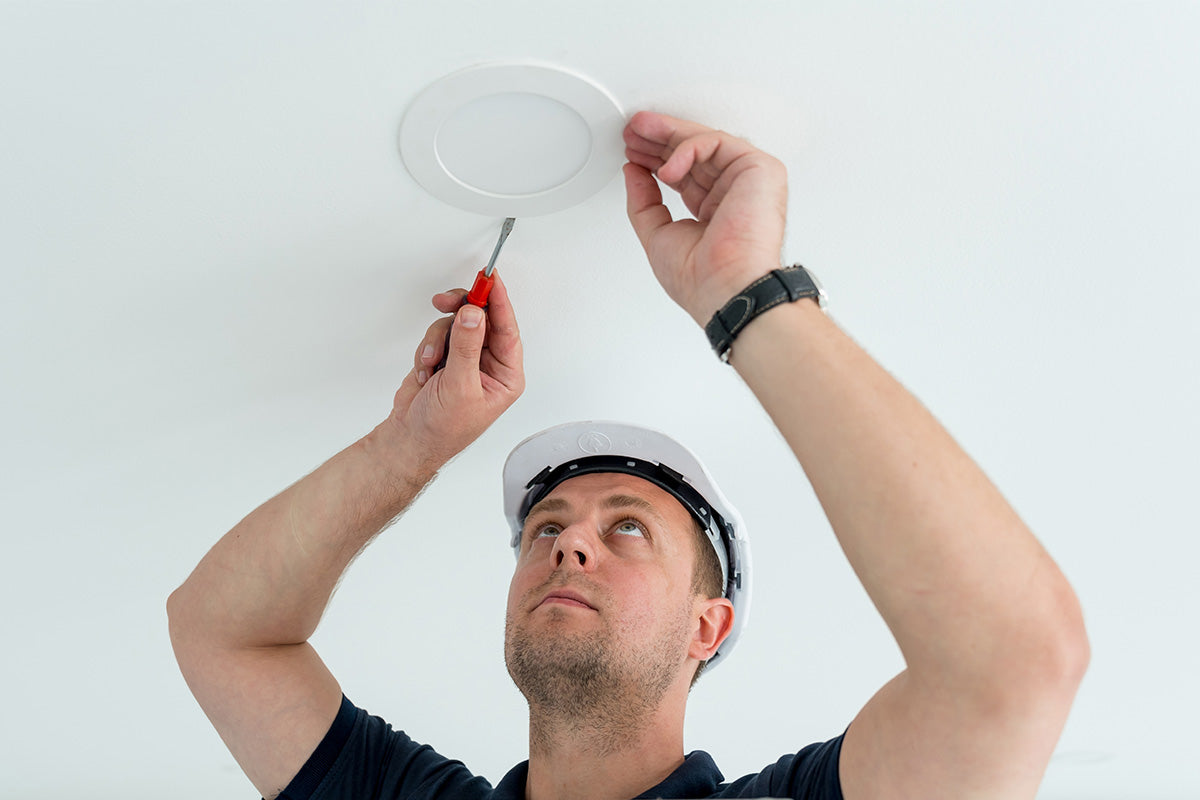
For recessed LED lights:
- Cut out holes using a template.
- Insert the can or housing and secure it in place.
- Connect the wires as directed by the manufacturer.
Read More: Remodeling Your Basement into a Home Gym: The Ultimate Guide
For ceiling-mounted lights:
- Secure the electrical box to a joist or support bracket.
- Mount the fixture, connect wires, and attach the cover.
Make sure all fixtures are properly grounded and secured.
Read More: 7 Creative Basement Gym Ideas for Every Fitness Enthusiast
Step 7: Add Switches or Dimmer Controls
You can wire a new switch inline or use an existing switch if your layout allows.
Switch wiring basics:
- Line (hot) from panel to switch
- Load from switch to light
- Connect ground wire to green screw on switch
If you prefer more control:
- Install smart switches or Wi-Fi dimmers
- Ensure compatibility with LED fixtures
Read More: Basement Home Gym Ideas for the Ultimate Workout Space
Step 8: Restore Power and Test Everything
Once all connections are secure:
- Turn the breaker back on.
- Test the lights and switches.
- Check for flickering, tripping breakers, or other signs of overload.
If all is good, your basement lighting system is ready to go!
Read More: The Ultimate Basement Gym Guide: How to Build a Home Fitness Sanctuary Below Ground
Code Compliance and Permits
Even if you’re doing the work yourself, local codes must be followed. In many areas, electrical work requires:
- Permits
- Inspections
- Compliance with NEC (National Electrical Code)
Always check with your local building department before starting.
Read More: 9 Tips to Turn Your Basement Into a Gym Powerhouse
When to Call a Professional
Although DIY is possible, call an electrician if:
- You’re unfamiliar with wiring
- You’re adding multiple switches or dimmers
- Your panel is already full
- You encounter aluminum or outdated wiring
Read More: How Much Does a Basement Renovation Cost? A Complete Guide for Homeowners (2025)
Cost Breakdown (Estimated DIY)
| Item | Estimated Cost |
|---|---|
| NM cable (50 ft) | $30–$50 |
| Recessed LED lights (6) | $70–$120 |
| Electrical boxes | $5–$20 |
| Switch/dimmer | $10–$40 |
| Wire nuts & connectors | $10 |
| Tools (if needed) | $50–$150 |
| Total | $175–$400 |
Hiring a pro for the same job could cost $500–$1,500 depending on scope.
Read More: What Is the Most Expensive Part of Finishing a Basement? (A Complete Cost Breakdown)
Final Thoughts
Adding lights to an existing circuit while finishing your basement is a smart and budget-friendly upgrade. With proper planning, the right tools, and a clear understanding of electrical loads and safety practices, most homeowners can complete this task successfully.
Just remember:
- Never overload a circuit.
- Use the correct wire gauge.
- Always prioritize safety.
- Follow local building codes.
A well-lit basement can completely transform the ambiance and usability of your new space—so don’t cut corners when it comes to lighting!